How to Install WordPress
WordPress is one of the most popular Content Management Systems, and around 30% of websites today are powered by its platform. WordPress is easy to use and install, and we’ve broken it down in this tutorial so that you can get started right away, and with no former experience required.
To install WordPress, start by registering for a domain and a web hosting account with any hosting provider. Figuring out what the best hosting company is can be a difficult task given the range of specifications, features, and prices in the market. Like most purchases, when you’re talking about hosting account, you get what you pay for so choose wisely.
We highly recommend one of the following WordPress hosting providers: Host Gator, Blue Host, and Metropolitan Host, each for their own reasons:
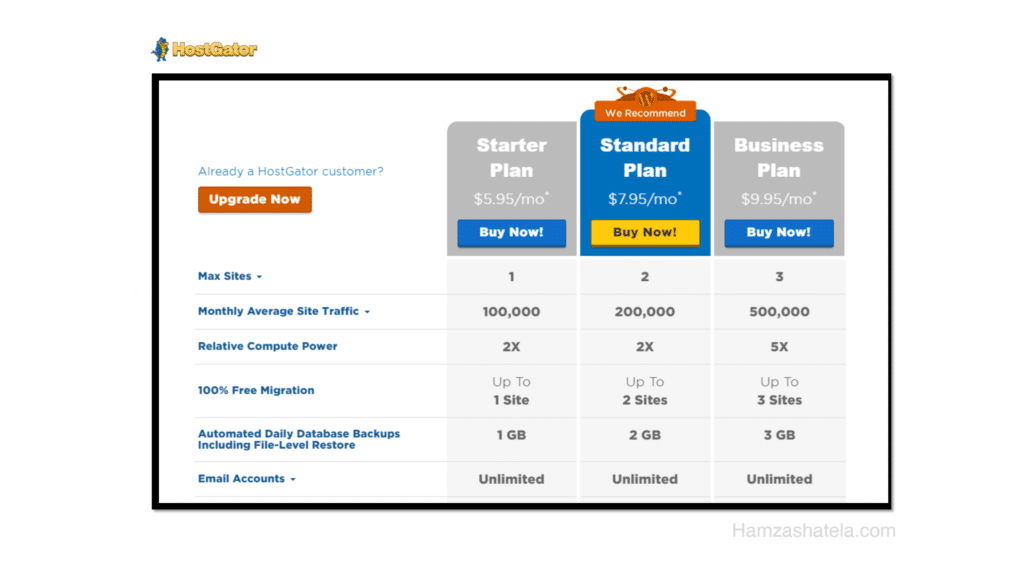
Host Gator: Host Gator has several flexible packages that suit all budgets.
- The Hatchling Plan costs $5.56 per month, and if you get the one-year package you also get support for one domain.
- The Baby Plan costs $7.96/month, and you get unlimited domains.
- The Business plan costs $11.96/month if you get it for a year, has the features of the other plans, and includes specialized options such as a toll-free number, a dedicated IP and a private SSL certificate. You also get 99.9% uptime guarantee for all three packages and a 45-day money back guarantee.
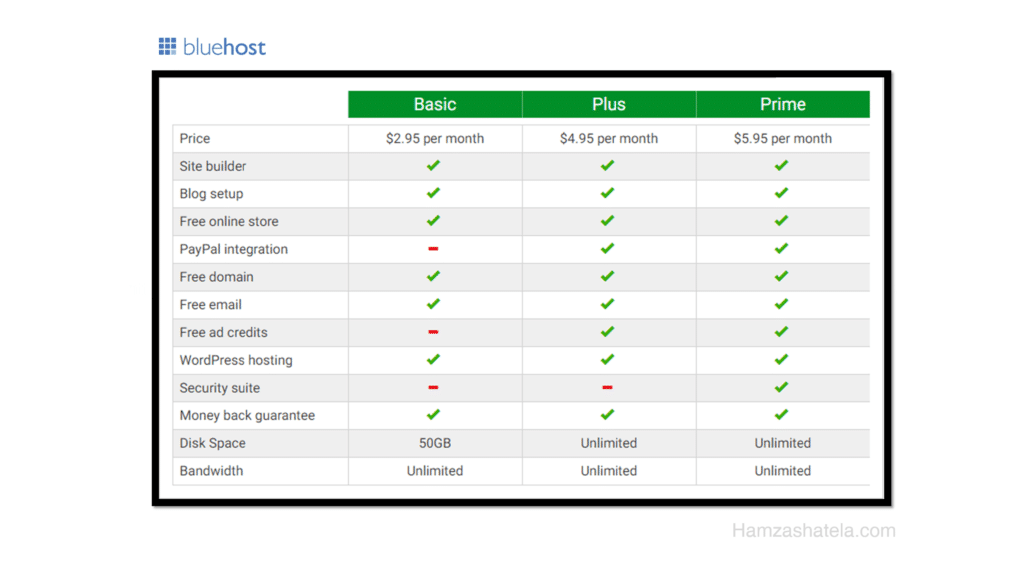
Blue Host: WordPress has been recommending Blue Host since 2005. Blue Host offers a free 1-year domain and a 50% discount on your first purchase
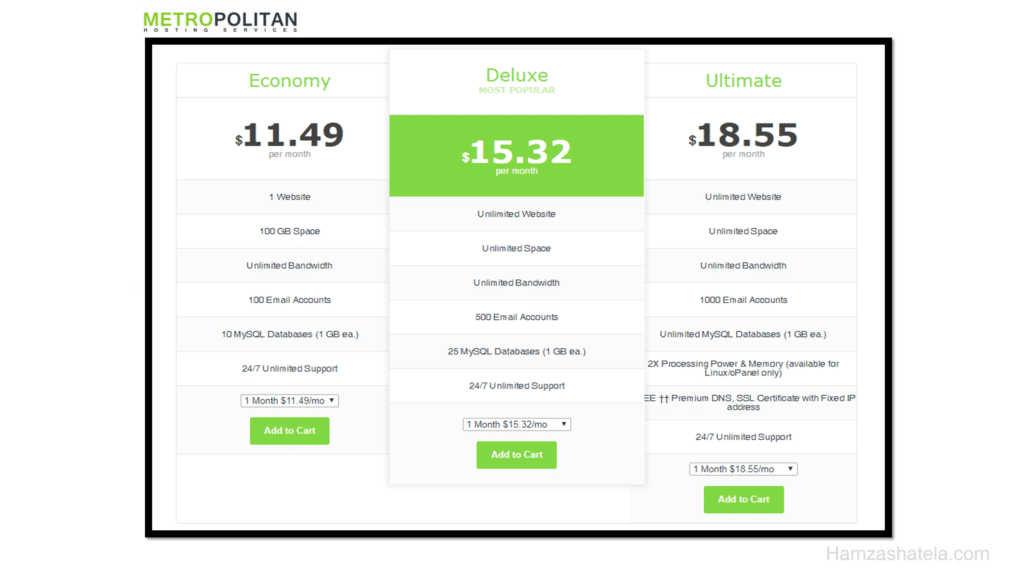
Metropolitan Host: We love Metropolitan Host and highly recommend it for hosting. Metropolitan Host has award-winning team support, with prices starting at $11.99/month. You’ll get hosting and website design by professionals, with three comprehensive hosting plans; Economy, Deluxe, and Ultimate. These plans cover the hosting needs of a diverse range of groups so whether you are a small business or a large corporation, one of these plans will be the perfect match for you.
Learn WordPress Hosting packages Pricing
Installing WordPress
In this tutorial, we’ll go over the steps needed to install WordPress on different platforms. There’s a link in each section, where you can find additional information, images, videos and presentations that allow you to navigate to the part you’re looking for. Please use the navigation list below.
- How to install wordpress on Blue Host
- How to install wordpress on Host Gator using QuickInstall
- Hos to install WordPress on Metropolitan Host
- How to install WordPress on local server
- How to Install WordPress using Softaculous
- How to Install WordPress using Fantastico
- How to Install WordPress Using MOJO Marketplace
- How to Install WordPress using FTP (Manual installation)
- How to Install a Multisites on WordPress
- What to do after Installing WordPress
-
How to install WordPress on Blue Host
- Log in to your Bluehost cPanel account.
- Find the Website section and select Install WordPress.
- Click on the Install button.
- Choose the domain name to install it to. In the field next to the domain, you can enter a subfolder such as ‘blog’ or leave it blank if you want the site’s main page to be the blog.
- If necessary, you can edit the email address, username and password for the new WordPress installation. Click “advanced options” and you can change those settings.
- Carefully go over the license and service agreements and click “agree” once you’re done
- Select the Install Now button.
Install WordPress on Blue Host the full tutorial
-
How to install WordPress on HostGator using QuickInstall
- Log into your cPanel.
- In the Software/Services section, click on the Quick Install icon.
- In the left menu, under Popular Installs, click WordPress, then click Install WordPress.
- Complete and submit the form.
Install WordPress on HostGator the full tutorial
-
How to install WordPress on Metropolitan Host
- Log in to your Metropolitan Host Account.
- Go to your Dashboard and find your hosting account
- Click manage account
- Find the Website section and select Install WordPress.
- Click the Install button.
- Choose the domain name to install it to. In the field next to the domain, you can enter a subfolder such as ‘blog’ or leave it blank if you want the site’s main page to be the blog.
- Edit the email address, username, and password for the new WordPress installation. Click “advanced options” and you can change those settings.
- Read through the license and service agreements and check the boxes.
- Select the Install Now button.
-
How to install WordPress on local server
- Install a local server (Mac: MAMP, PC:XAMPP or WAMP).
- Create a new database.
- Download WordPress from wordpress.org and extract the files to a new folder under the htdocs folder.
- Rename the wp-config-sample.php file to wp-config.php and update the database details according to your local server.
- Run wp-admin/install.php and follow the instructions to install WordPress.
Install WordPress on local server the full tutorial
-
How to Install WordPress using Fantastico
- Login to your cPanel Account
- Access Fantastico from the Software/Services Section
- Select WordPress
- Select New Installation for WordPress
- Enter your WordPress Site Information and Install
Install WordPress using Fantastico the full tutorial
-
How to Install WordPress Using MOJO Marketplace
- Log in to your Bluehost cPanel account.
- Find the Website section and select Install WordPress.
- Click the Install button.
- Choose the domain name to install it to. “In the field next to the domain, you can enter a subfolder such as (blog) or leave it blank if you want the site’s main page to be the blog.”
- If necessary, you can edit the email address, username and password for the new WordPress installation. Click “advanced options” and you can change those settings.
- Read through the license and service agreements and check the boxes.
- Click Install Now button.
Install WordPress using MOJO MARKETPLACE the full tutorial
-
How to Install WordPress using FTP (Manual Installation)
- Download WordPress
- Upload WordPress to Hosting Account
- Create MySQL Database and User
- Configure wp-config.php
- Run the Installation
- Fill Form to Complete the Installation
Install WordPress using FTP the full tutorial
-
How to Install a Multisites on WordPress
- First go to your File manager in Cpanel
- Add define( ‘WP_ALLOW_MULTISITE’, true ); to your wp-config.php file
- Visit the network setup page
- Choose either a subdomain or sub directory structure
- Enter your network name & Admin Email
- Update your wp-config.php file
- Update your .htaccess file
- Log back in to your website
- Configuring wildcard sub-domains
- Configuring virtual hosts, specifying the same document root for each
- Creating addon domains or subdomains in cPanel or in a similar web hosting control panel
- Configuring Your Multisite Installation
Install Multi WordPress sites the full tutorial
-
What to do after Installing WordPress
Once you’ve set up your WordPress account, you’ll need to install a theme, add the desired plugins to your WordPress website, and plug in your content and data. The final step is to optimize your website so that different search engines to drive traffic to your site. Check the links below to learn more on each step.
-
Choosing A Theme
-
Identify Plugins Needed
- How to add a plugin to WordPress website
- List of top 20 used WordPress plugin
-
Optimize Your Website
